
September 28, 2026
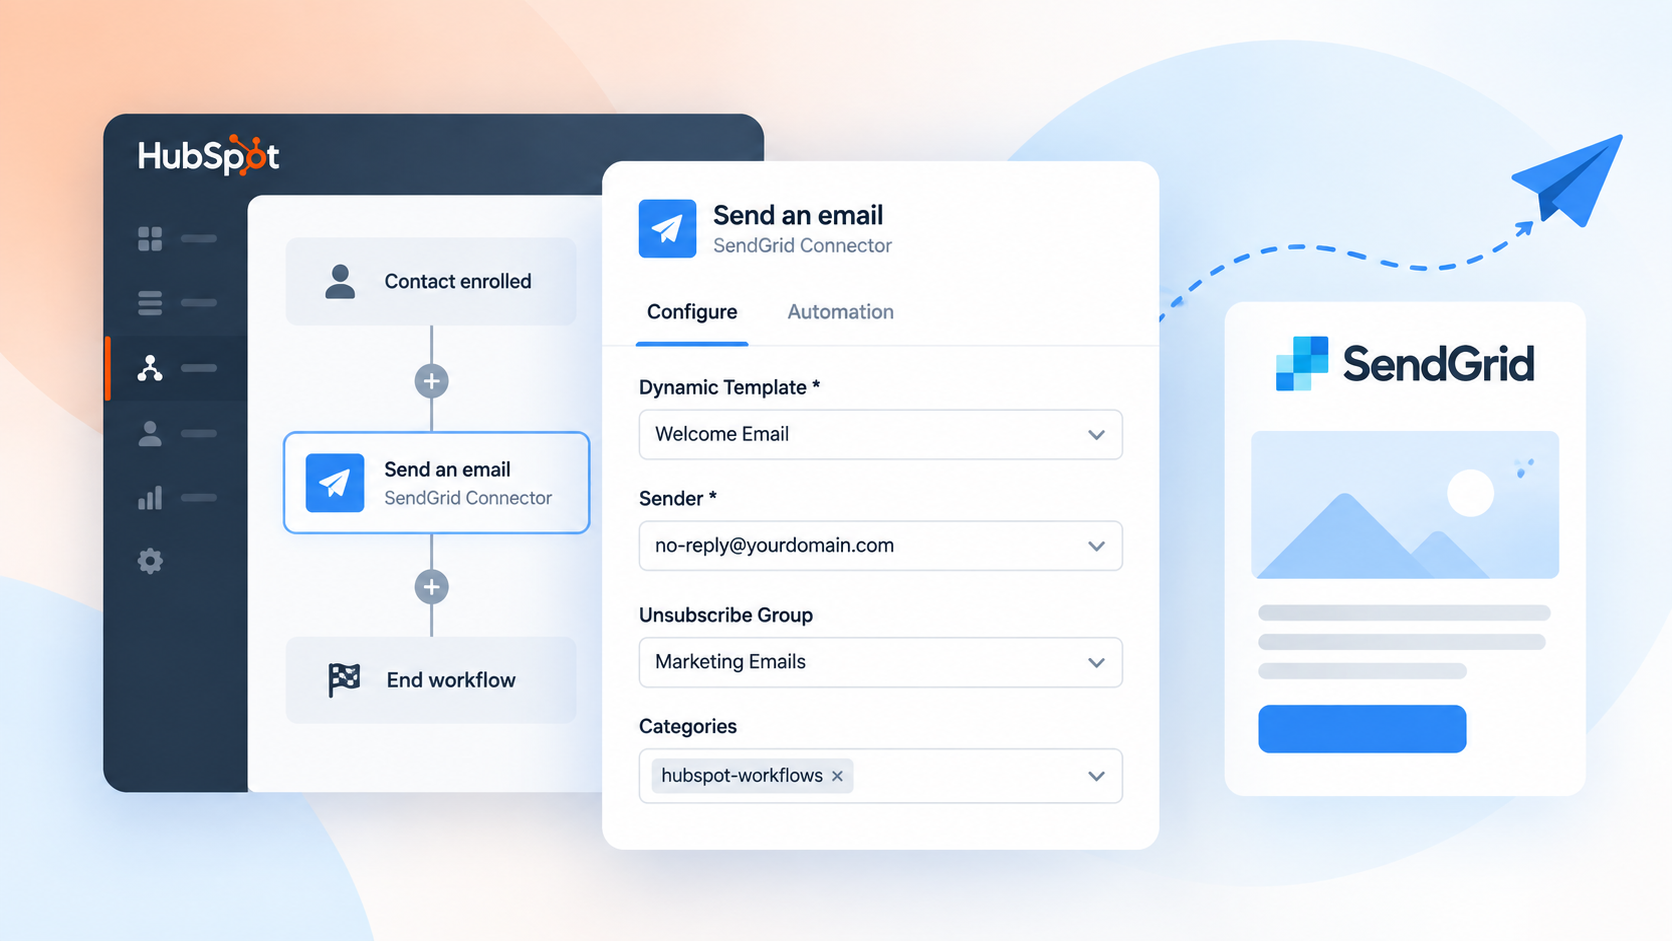
HubSpot workflows are useful for deciding when an email should be sent. SendGrid is built to handle how that email is delivered.
SendGrid Connector for HubSpot connects the two without requiring custom middleware or a separate automation platform. A HubSpot workflow triggers the action, the connector retrieves the data required for that specific contact, and the email is sent through your own SendGrid account using an existing Dynamic Template.
The result is a relatively simple architecture:
HubSpot workflow → SendGrid Connector → SendGrid API → Recipient
In this guide, we'll look at how that flow works, how to configure the integration correctly, and how to avoid the most common issues around API permissions, HubSpot properties, templates, and senders.
If you're still evaluating why you might want to route HubSpot workflow emails through SendGrid in the first place, our guide on sending emails from HubSpot without using Marketing Contacts covers the Marketing Contact limits, HubSpot's transactional email options, and the cost implications in more detail.
What SendGrid Connector Adds to HubSpot
Once installed, SendGrid Connector adds a Send an email action that can be used inside HubSpot workflows.
Instead of creating and delivering the email through HubSpot, the workflow delegates delivery to SendGrid.
HubSpot remains responsible for:
- workflow enrollment criteria
- delays and branches
- contact data
- the business logic that determines when the action runs
SendGrid remains responsible for:
- the email template
- sender configuration
- email delivery
- unsubscribe groups
- categories
- SendGrid-side delivery and engagement data
The connector sits between the two and passes the information required to execute the send.
This means you can keep automation logic inside HubSpot while continuing to use your existing SendGrid infrastructure and templates.
Before You Start
A basic implementation requires three things:
- SendGrid Connector installed in your HubSpot account.
- A SendGrid API key with the permissions required by the connector.
- At least one SendGrid Dynamic Template and a configured sender.
You'll also need the appropriate HubSpot permissions to configure the app. Accessing the SendGrid Connector settings requires system administrator access in HubSpot.
If your SendGrid account and templates are already configured, most of the integration work happens only once.
Step 1: Create a Dedicated SendGrid API Key
The first connection between HubSpot and SendGrid is established using a SendGrid API key.
You can technically create a key with Full Access, but for a production integration a dedicated key with Custom Access is preferable. It lets you limit the credentials to the permissions actually required by the connector.
Create a new API key in SendGrid under Settings → API Keys and enable:
- Category Management: Read Access
- Mail Send: Full Access
- Sender Authentication: Read Access
- Suppressions: Read Access
- Template Engine: Read Access
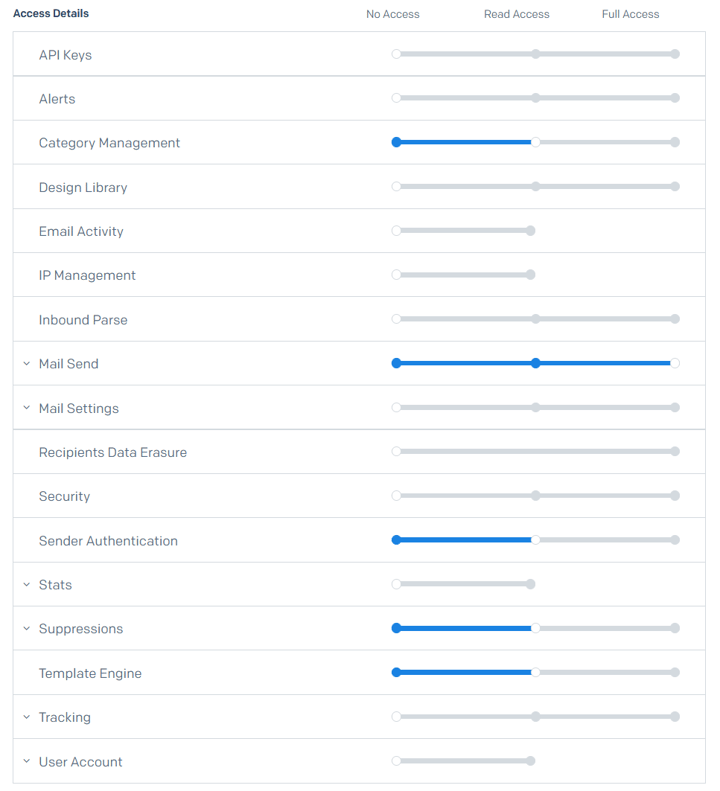
The connector needs read permissions to retrieve the SendGrid resources that can be selected inside HubSpot, while Mail Send permission allows it to execute the actual email request.
Copy the API key when SendGrid displays it.
As with any API credential, avoid using the same key for unrelated integrations. A dedicated key makes permissions easier to understand, rotate, and revoke if necessary.
Step 2: Connect SendGrid to HubSpot
In HubSpot, open:
Marketplace → Connected Apps → SendGrid Connector
Under General Settings, open the connector configuration.
Enter the SendGrid API key and connect the account.
Once the API connection is active, the connector can retrieve the SendGrid resources required by workflow actions, including your templates and configured senders.
There is an important operational detail here: if you disconnect and later reconnect your SendGrid account, existing SendGrid Connector workflow actions need to be configured again.
For this reason, rotating or replacing a production API connection should be treated as a configuration change rather than a completely transparent credential swap.
Step 3: Decide Which HubSpot Properties Can Be Sent to SendGrid
Connecting the API is only part of the setup.
Dynamic Templates become more useful when they can use information stored on the HubSpot contact, such as:
- first name
- company name
- account information
- lifecycle data
- renewal dates
- product or service information
- other custom contact properties
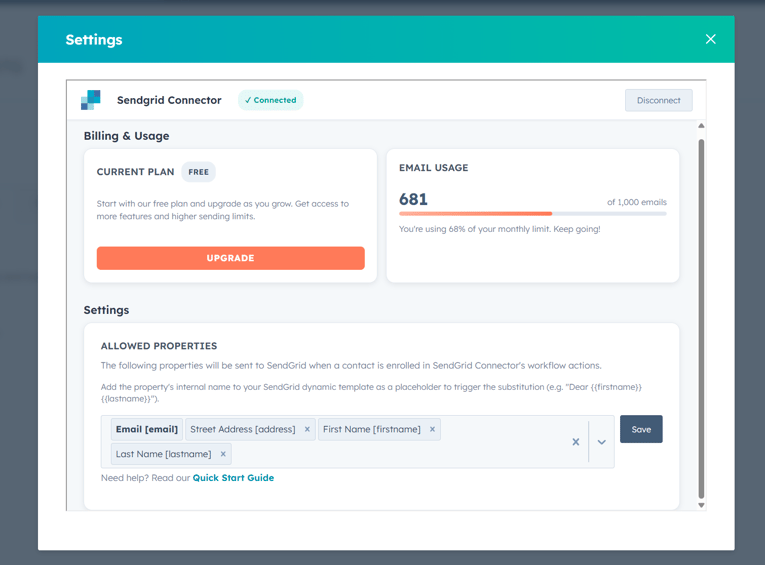
SendGrid Connector does not automatically expose every HubSpot property to SendGrid.
Instead, the app provides an Allowed Properties setting where you explicitly select the properties that can be transmitted when an email is sent.
This has two advantages.
First, it makes the integration predictable. You know which fields are available to your templates.
Second, it limits the HubSpot data shared with SendGrid to the information that is actually required for your email automation.
After adding the required properties, save the configuration.
Step 4: Configure Your SendGrid Dynamic Template
Personalization is handled through SendGrid Dynamic Templates.
Suppose your HubSpot contact contains a property with the internal name:
firstname
Your SendGrid template can reference it using the standard Dynamic Template syntax:
When the workflow executes, the connector reads the corresponding property from the HubSpot contact and sends its value to SendGrid as part of the request.
The important detail is that the placeholder must match the HubSpot property internal name, not necessarily the label you see in the CRM interface.
For example, a property displayed to users as:
Customer renewal date
might internally be named something like:
customer_renewal_date
The Dynamic Template must use the internal name expected by the connector.
You can find a property's internal name in HubSpot under:
Settings → Data Management → Properties
Then use that same identifier in the SendGrid template:
Only properties included in the connector's Allowed Properties configuration can be passed for substitution.
Template versions
SendGrid Dynamic Templates can contain multiple versions.
When a SendGrid Connector workflow action runs, the active version of the selected template is used.
This is useful operationally because template content can be updated in SendGrid without rebuilding the HubSpot workflow action. However, it also means that publishing a new active version in SendGrid can immediately affect emails triggered by existing HubSpot workflows.
Template activation should therefore be considered part of your production deployment process.
Step 5: Add SendGrid to a HubSpot Workflow
Once the connection and properties are configured, open an existing HubSpot workflow or create a new one.
Add an action and select the SendGrid Connector Send an email action.
The workflow action lets you configure the SendGrid resources that should be used for that specific send.
Select:
- the Dynamic Template
- the Sender
- optionally, an Unsubscribe Group
- optionally, one or more Categories
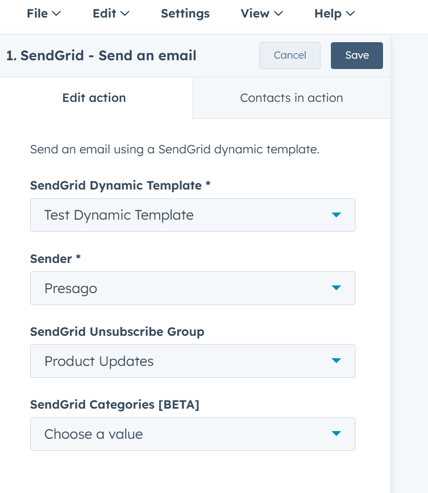
The sender configuration comes from SendGrid. The selected sender determines values such as the sender name, From address, and Reply-to address.
These values should therefore be configured in SendGrid rather than duplicated inside the HubSpot workflow.
At runtime, the workflow action now has everything it needs:
- HubSpot determines that the contact has reached the action.
- SendGrid Connector receives the workflow execution.
- The connector retrieves the contact data required for the send.
- Allowed HubSpot properties are mapped to the Dynamic Template data.
- The request is sent through your connected SendGrid account.
- SendGrid renders the active template and delivers the email.
The rest of your HubSpot workflow can continue normally.
A Practical Example
Consider an onboarding workflow triggered when a new customer becomes active.
HubSpot contains these contact properties:
firstname
company
customer_portal_url
Those properties are added to the connector's Allowed Properties configuration.
The SendGrid Dynamic Template can then contain content such as:
Hi ,
Your {} account is ready.
Access your portal here:
The HubSpot workflow does not need to build the email itself.
Its job is simply to determine when the customer reaches the correct onboarding stage and trigger the SendGrid action.
This separation becomes particularly useful when the same email design or template infrastructure is already managed centrally in SendGrid.
Understanding the Data Flow
For teams reviewing integrations from a security or privacy perspective, it helps to separate configuration data from transient contact data.
The SendGrid API key required by the integration is stored encrypted.
When a workflow action executes, the connector processes the data needed to complete that send. This can include:
- the recipient's email address
- first and last name
- HubSpot properties explicitly allowed by the customer
The contact data required for the workflow action is temporarily processed and transmitted to SendGrid rather than persistently stored by Presago.
Additional properties remain under the customer's control through the Allowed Properties configuration.
Once transmitted to SendGrid, that data is processed within the customer's own SendGrid environment and is subject to the customer's SendGrid configuration and agreement.
This data flow is worth documenting internally if your organization maintains integration registers, data maps, or privacy assessments.
For a broader perspective on defining how information moves between tools and where each system should sit in your stack, see Data Management Tools: How to Build a Stack That Works.
Common Configuration Problems
Most SendGrid Connector issues come from configuration mismatches rather than workflow logic.
The template variable is empty
Check three things:
- The HubSpot contact actually has a value for the property.
- The property has been added to Allowed Properties.
- The SendGrid placeholder uses the HubSpot property's internal name.
A property label and its internal name are not necessarily the same.
The wrong template content is being sent
Check which version of the Dynamic Template is currently active in SendGrid.
The connector uses the active version.
A sender is missing
Senders are managed in SendGrid.
Make sure the required sender has been correctly configured in the SendGrid account connected to the app.
The API connection fails
Check the permissions assigned to the API key.
A restricted API key is recommended, but removing one of the permissions required by the connector can prevent it from retrieving resources or sending email.
A workflow stops working after reconnecting SendGrid
If you disconnect and reconnect the SendGrid account, reconfigure the existing SendGrid actions in your HubSpot workflows.
This is especially important for production accounts with multiple workflows using the connector.
Using Unsubscribe Groups and Categories
The workflow action can also use existing SendGrid Unsubscribe Groups and Categories.
Unsubscribe Groups allow you to connect emails to the subscription-management structure already configured in SendGrid.
Categories provide an additional way to classify email activity inside SendGrid, which can be useful when multiple HubSpot workflows share the same SendGrid account.
For example, categories could distinguish between email generated by:
- onboarding workflows
- lifecycle automation
- account notifications
- renewal processes
- customer education
The exact structure depends on how your organization already uses SendGrid, but the connector does not require you to recreate that configuration inside HubSpot.
HubSpot for Logic, SendGrid for Delivery
The main architectural advantage of the integration is not simply that it connects two APIs.
It keeps responsibilities separated.
HubSpot can remain the system where teams define customer state and workflow logic. SendGrid can remain the system where email infrastructure, templates, sender identities, suppressions, and delivery are managed.
SendGrid Connector provides the execution layer between them.
For organizations that already use both platforms, this avoids introducing another automation system just to move an email request from HubSpot to SendGrid.
And because the workflow action uses the same enrollment criteria, branches, delays, and contact properties as the rest of the automation, SendGrid delivery becomes another step in the HubSpot workflow rather than a separate process.
This is also where the alternative to HubSpot's native email model becomes most relevant. If Marketing Contact limits or the transactional email add-on are part of your evaluation, see Send Emails from HubSpot Without Using Marketing Contacts for the detailed comparison.
Getting Started
SendGrid Connector for HubSpot is available from the HubSpot Marketplace.
The Free plan supports up to 1,000 emails per month, which is enough to configure the integration, build a production workflow, and test how SendGrid Dynamic Templates work with your HubSpot data before moving to larger sending volumes.
For the exact installation and configuration screens, see the SendGrid Connector for HubSpot Quick Start in the Presago documentation.
Once the initial connection and property configuration are complete, adding SendGrid delivery to a new HubSpot automation is reduced to a standard workflow action: select the template, choose the sender, configure the optional SendGrid settings, and let the workflow handle the trigger.